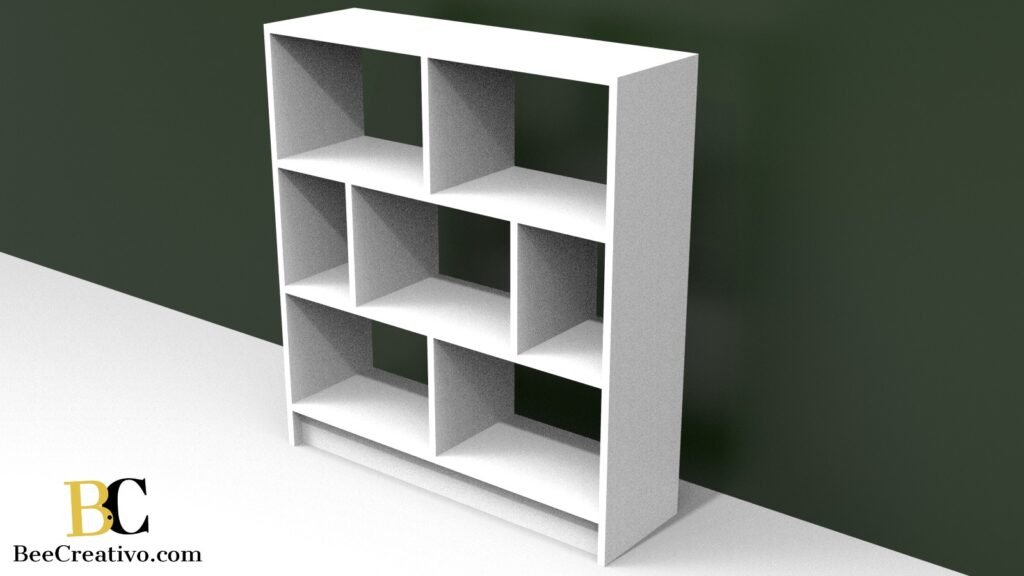
A guide to DIY Bookshelf to store your precious books, novels and important files. It comes with a simple design to make it easy to DIY and a pleasing appearance that makes it suitable to place it anywhere in your house. follow this complete and easy guide to make your own bookshelf.
Materials and Tools
Start by gathering the Materials and Tools needed to diy bookshelf. Make a list of missing materials or tools which you need to procure.
Materials Required
- 3 White Chipboard Boards 2.5 meter long, 300mm of width and 18mm thick
- 1 White Chipboard Board 1 meter long, 100mm of Width and 18mm thick
- 12 Wood Screws M4 x 50mm long
- 36 Dowels with an 8mm of diameter
- Edging Tape for a smooth finish
- Screw hole Stickers or Caps to cover the holes
You can choose to use a different color or a different board material.
Tools Required
- Screw driver
- Drill machine
- Ø8 Drill bit
- Ø4 Drill bit
- Drilling Jig
- Table/Miter saw
- Goggles
- Mask
- Gloves
- Tape measure
While cutting and drilling holes to diy bookcase use goggles, a mask and gloves to avoid inhaling sawdust, protect your eyes and hands from splinters.
Step by Step Guide to DIY Bookshelf
Step 1 Cutting List
For this step you will need the Table Saw, a pencil and a tape measure to mark cutting lines on boards. Use goggles, Gloves and a Mask to protect yourself.
the 3 White Chipboard Boards T-18mm W-300mm L-2.5m to cut Board A, Board B, Board C, Board D and Board E at the lengths shown in the table below and mark each board with it’s respective tag. Cut Board F from White Chipboard Board with Thickness-18mm Width-100mm and Length-1m
Board A
Length to cut [mm]: 940
Board Width [mm]: 300
Board Thickness [mm]: 18
Quantity:1
Board B
Length to cut [mm]: 940
Board Width [mm]: 300
Board Thickness [mm]: 18
Quantity:2
Board C
Length to cut [mm]: 940
Board Width [mm]: 300
Board Thickness [mm]: 18
Quantity:1
Board D
Length to cut [mm]: 940
Board Width [mm]: 300
Board Thickness [mm]: 18
Quantity:4
Board E
Length to cut [mm]: 940
Board Width [mm]: 300
Board Thickness [mm]: 18
Quantity:2
Board F
Length to cut [mm]: 940
Board Width [mm]: 100
Board Thickness [mm]: 18
Quantity:1
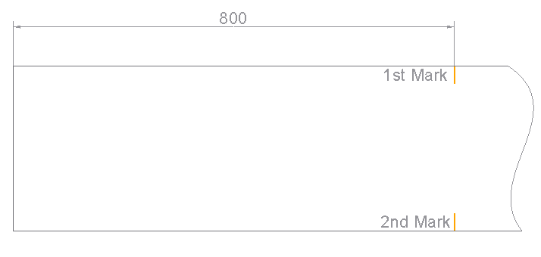
Tips: use a tape measure and a pencil to make the 1st mark from the edge to the length to cut ( as 800mm in example image below ) on one side and then the 2nd mark on the other side of the board at same length as shown in the image below. draw a line to join the 2 marks and cut the board using table saw.
Step 2 Drill Holes
Make use of the drilling jig to drill the holes straight and set the adjustable depth stop on the drill to “length of the hole + Drilling Jig height”.
Board A
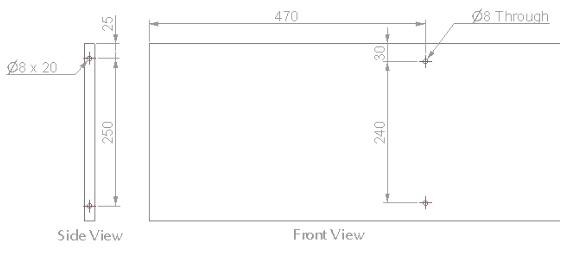
Start by marking the hole positions, shown in the image below, on board A. To do this you will need a pencil, tape measure and a ruler or you can use one of the boards. Make a mark on the front face of the board from the edge to 470mm of distance, make another mark at the same distance but on the opposite edge. Use the ruler or a board to unite the two marks by making a line. On this line mark hole positions, first hole 30mm from the edge and the second hole 240mm from the first hole.
Repeat the process to mark hole positions on the side view of the board. Start with creating a line centered to board section and then mark hole positions at the distances shown in image below.
Use the Ø8 drill bit to make 2 holes Ø8 ( drill throughout the board) on the front face and 2 holes Ø8 x 20mm of depth on the side face of the board.
Board B
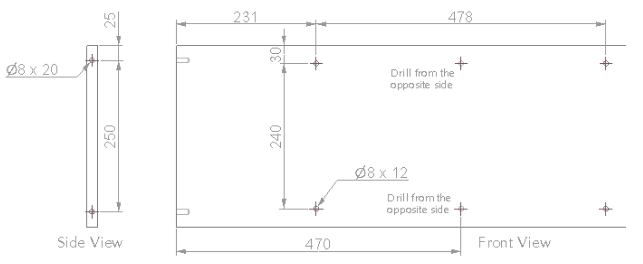
Use a drill bit Ø8 to drill 4 holes Ø8 x 12 on the front face of the board and 2 holes Ø8 x 12 On the back side.
Drill 2 holes Ø8 x 20 in positions shown in the left view of the image below and 2 holes Ø8 x 20 on the opposite side in the same positions.
Repeat the steps to drill holes in the second board.
Board C
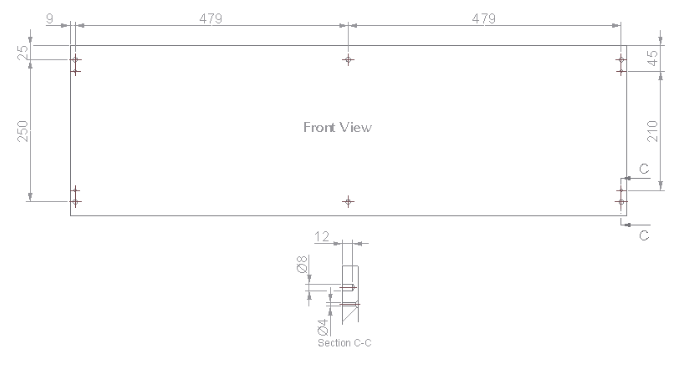
Drill 6 holes Ø8 x 12mm in positions shown in image below. Make sure to drill the holes straight.
Replace the Ø8 drill bit with a Ø4 drill bit and turn the board around to drill 4 holes through the board and countersink holes for screws head to fit in as shown in the sectional view in image below.
Board D
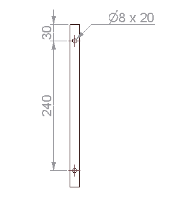
Drill 2 holes Ø8 x 20mm in positions shown in image below and 2 holes in same positions on the opposite face. The first hole is 30mm from the edge and drill the second hole to 200mm of distance from the first hole.
Board E
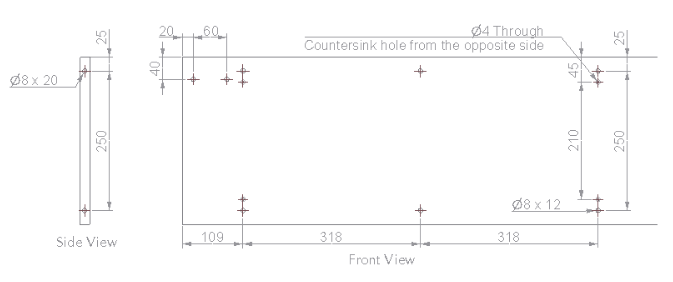
Board E has 8 holes Ø8 x 12 and 4 holes Ø4 – through on the front face of the board. 2 holes Ø8 x 20 on the left side face and 2 on the right side face.
Drill countersink holes, as shown in image below, on Ø4 Holes.
Board F
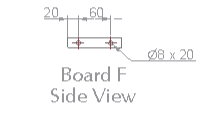
Finally the last board to drill the holes in. Drill 2 holes Ø8 x 20 as shown in image below on the side view of the board and 2 holes of same length on the opposite face.
Step 3 Apply Finishes
In this step we will inspect our bookcase to findout if and where a finishing touch is required to improve the look of our bookcase. The chipboards used to make this bookcase have already a smooth appearance with a shining white color.
You might need to clean it to remove any dust and apply an edging tape to cover visible sawn edges. Follow the steps below to apply Edging Tape on these edges to make the bookcase neat and tidy.
You just need to hold the tape in place and apply heat. Cut the tape to the exact length and make sure to hold the tape straight to get the best results.
Step 4 Assemble Parts Together
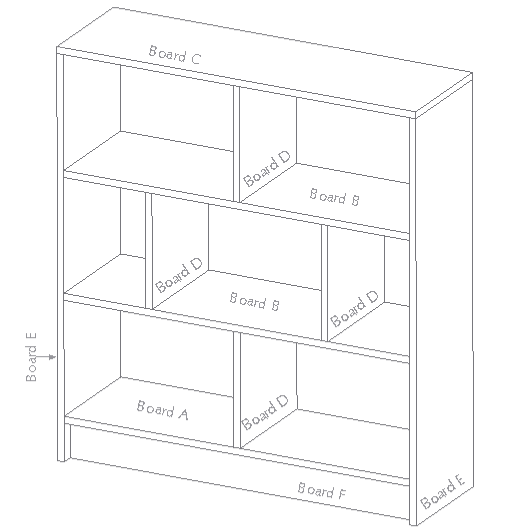
We are at the final Step to get our bookcase ready to accommodate our books.
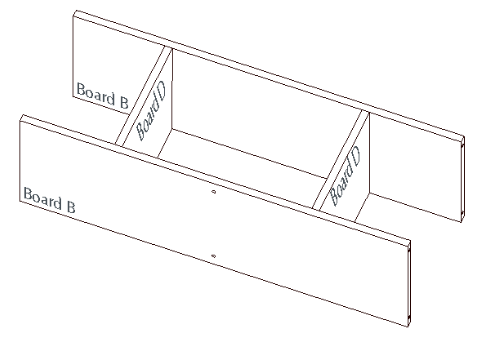
We will Start by assembling 2x Board B and 2x Board D together. Use Ø8 dowels to secure the boards together. Apply glue around the dowels and on faces before assembling them together.
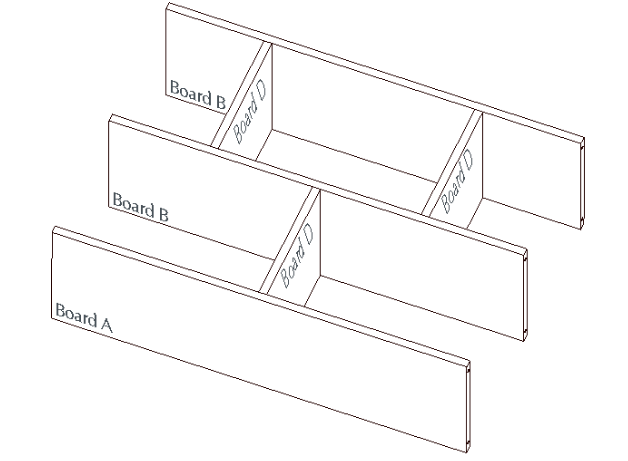
As Shown in image below, Assemble Board A and Board D with boards already assembled. Use wood glue and Ø8 Dowels to secure them together.
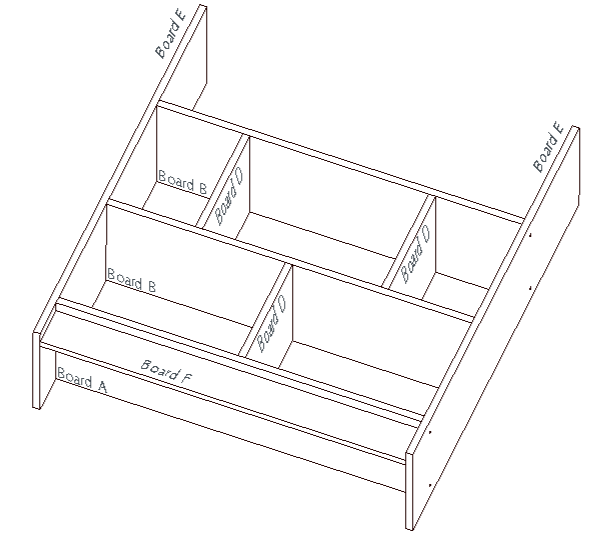
Put the dowels into Ø8 Holes and assemble one Board E on left side and then secure Board F on Board E with Ø8 Dowels. Hold board F on the other side and then assemble the second Board E on the right side and secure the structure with 8 screws M4 x 50 to screw into Ø4 holes on Board E.
We are at the very final Step of this guide. We need to assemble the last 2 boards left. Start with assembling Board D first and then secure it with Board C. Use Ø8 dowels and 4 M4 x 50 screws to lock the boards together.

